Popular:

  1. Home  > 
  2. Blog   >  
  3. The Ultimate Guide To Standard Photo Sizes

Explore our ultimate guide to standard photo sizes to find out how to choose the right resolution and aspect ratio to get the best results for your prints.


Use this guide to choose the right size and frames to personalize your walls with pictures of your family or style your home with your favorite holiday images. To revamp your interior design, you can also check out our vast library of high-resolution stock photos on PikWizard.


Choosing the right image size is also important when it comes to your screens. Files that are too large slow down your website, small photos get pixelated, and social media image sizes are constantly in flux.


Learn what to watch out for when creating images for the web and different devices. To ensure your image posts make your audience stop scrolling and click through to your content, check for guidance frequently to always create eye-catching imagery for your social media campaigns. We’ve got the latest tips on image sizes ready for you below.

What are the Standard Sizes for Photos?

The origin of standard photo print sizes lies with film photography where a 35 mm film was used to produce negatives with a 3:2 width to height ratio. This format is still widely used in digital cameras today. All other print sizes developed out of the original standard size of 3:2.


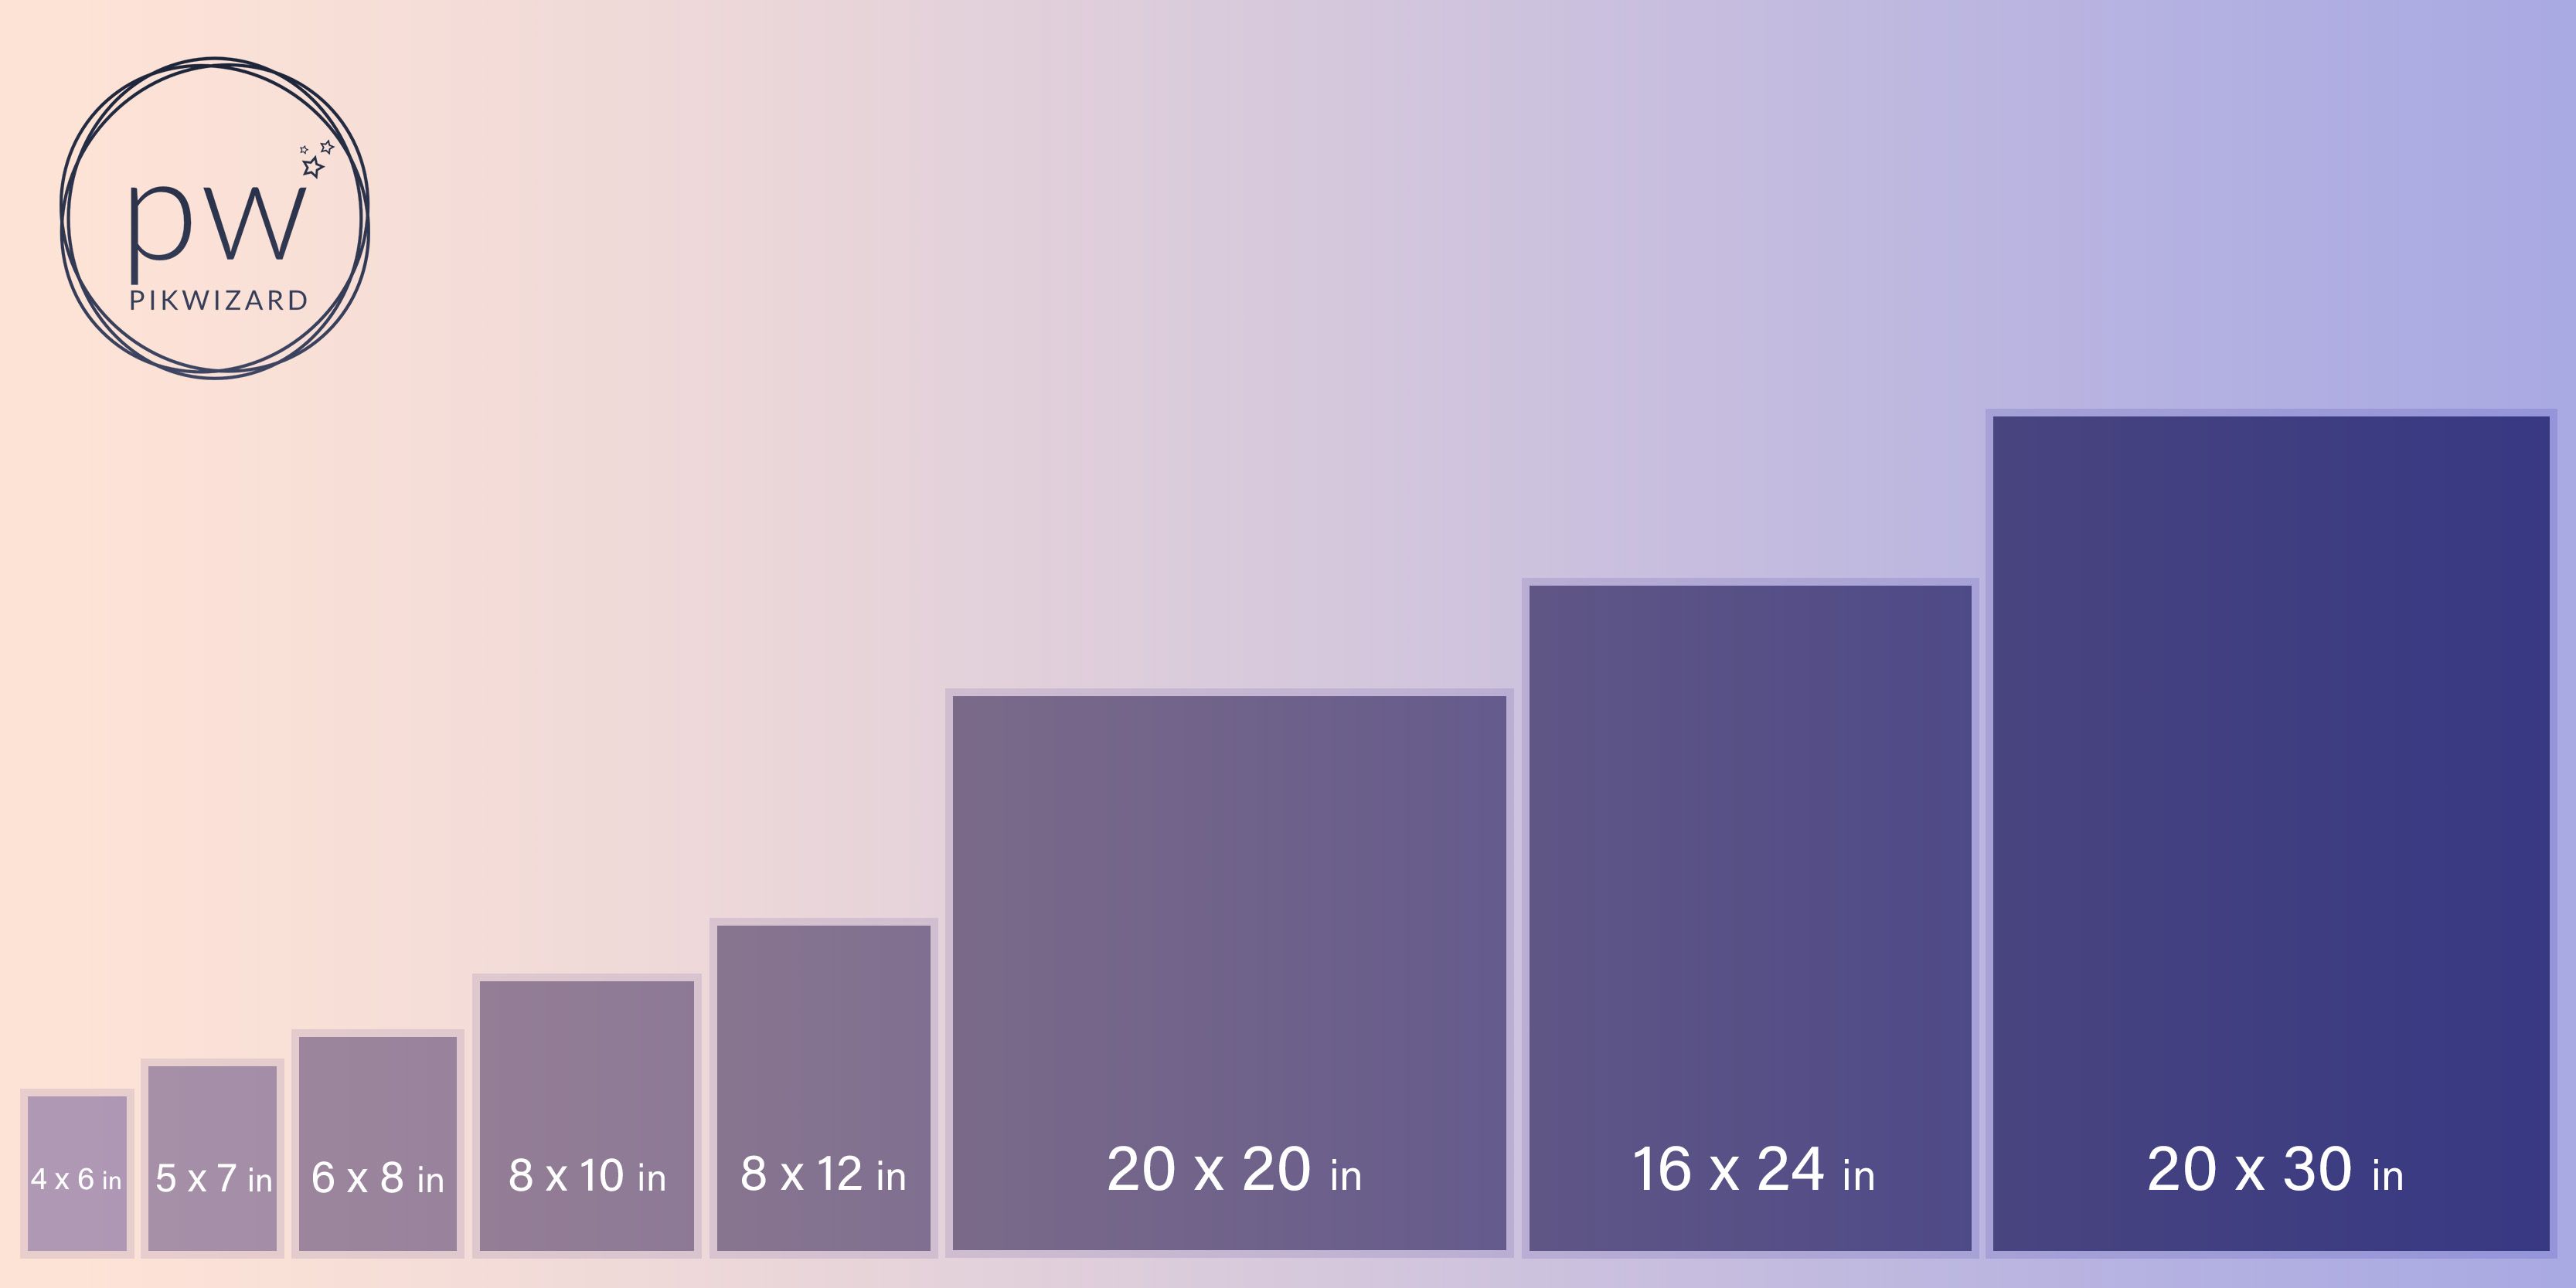
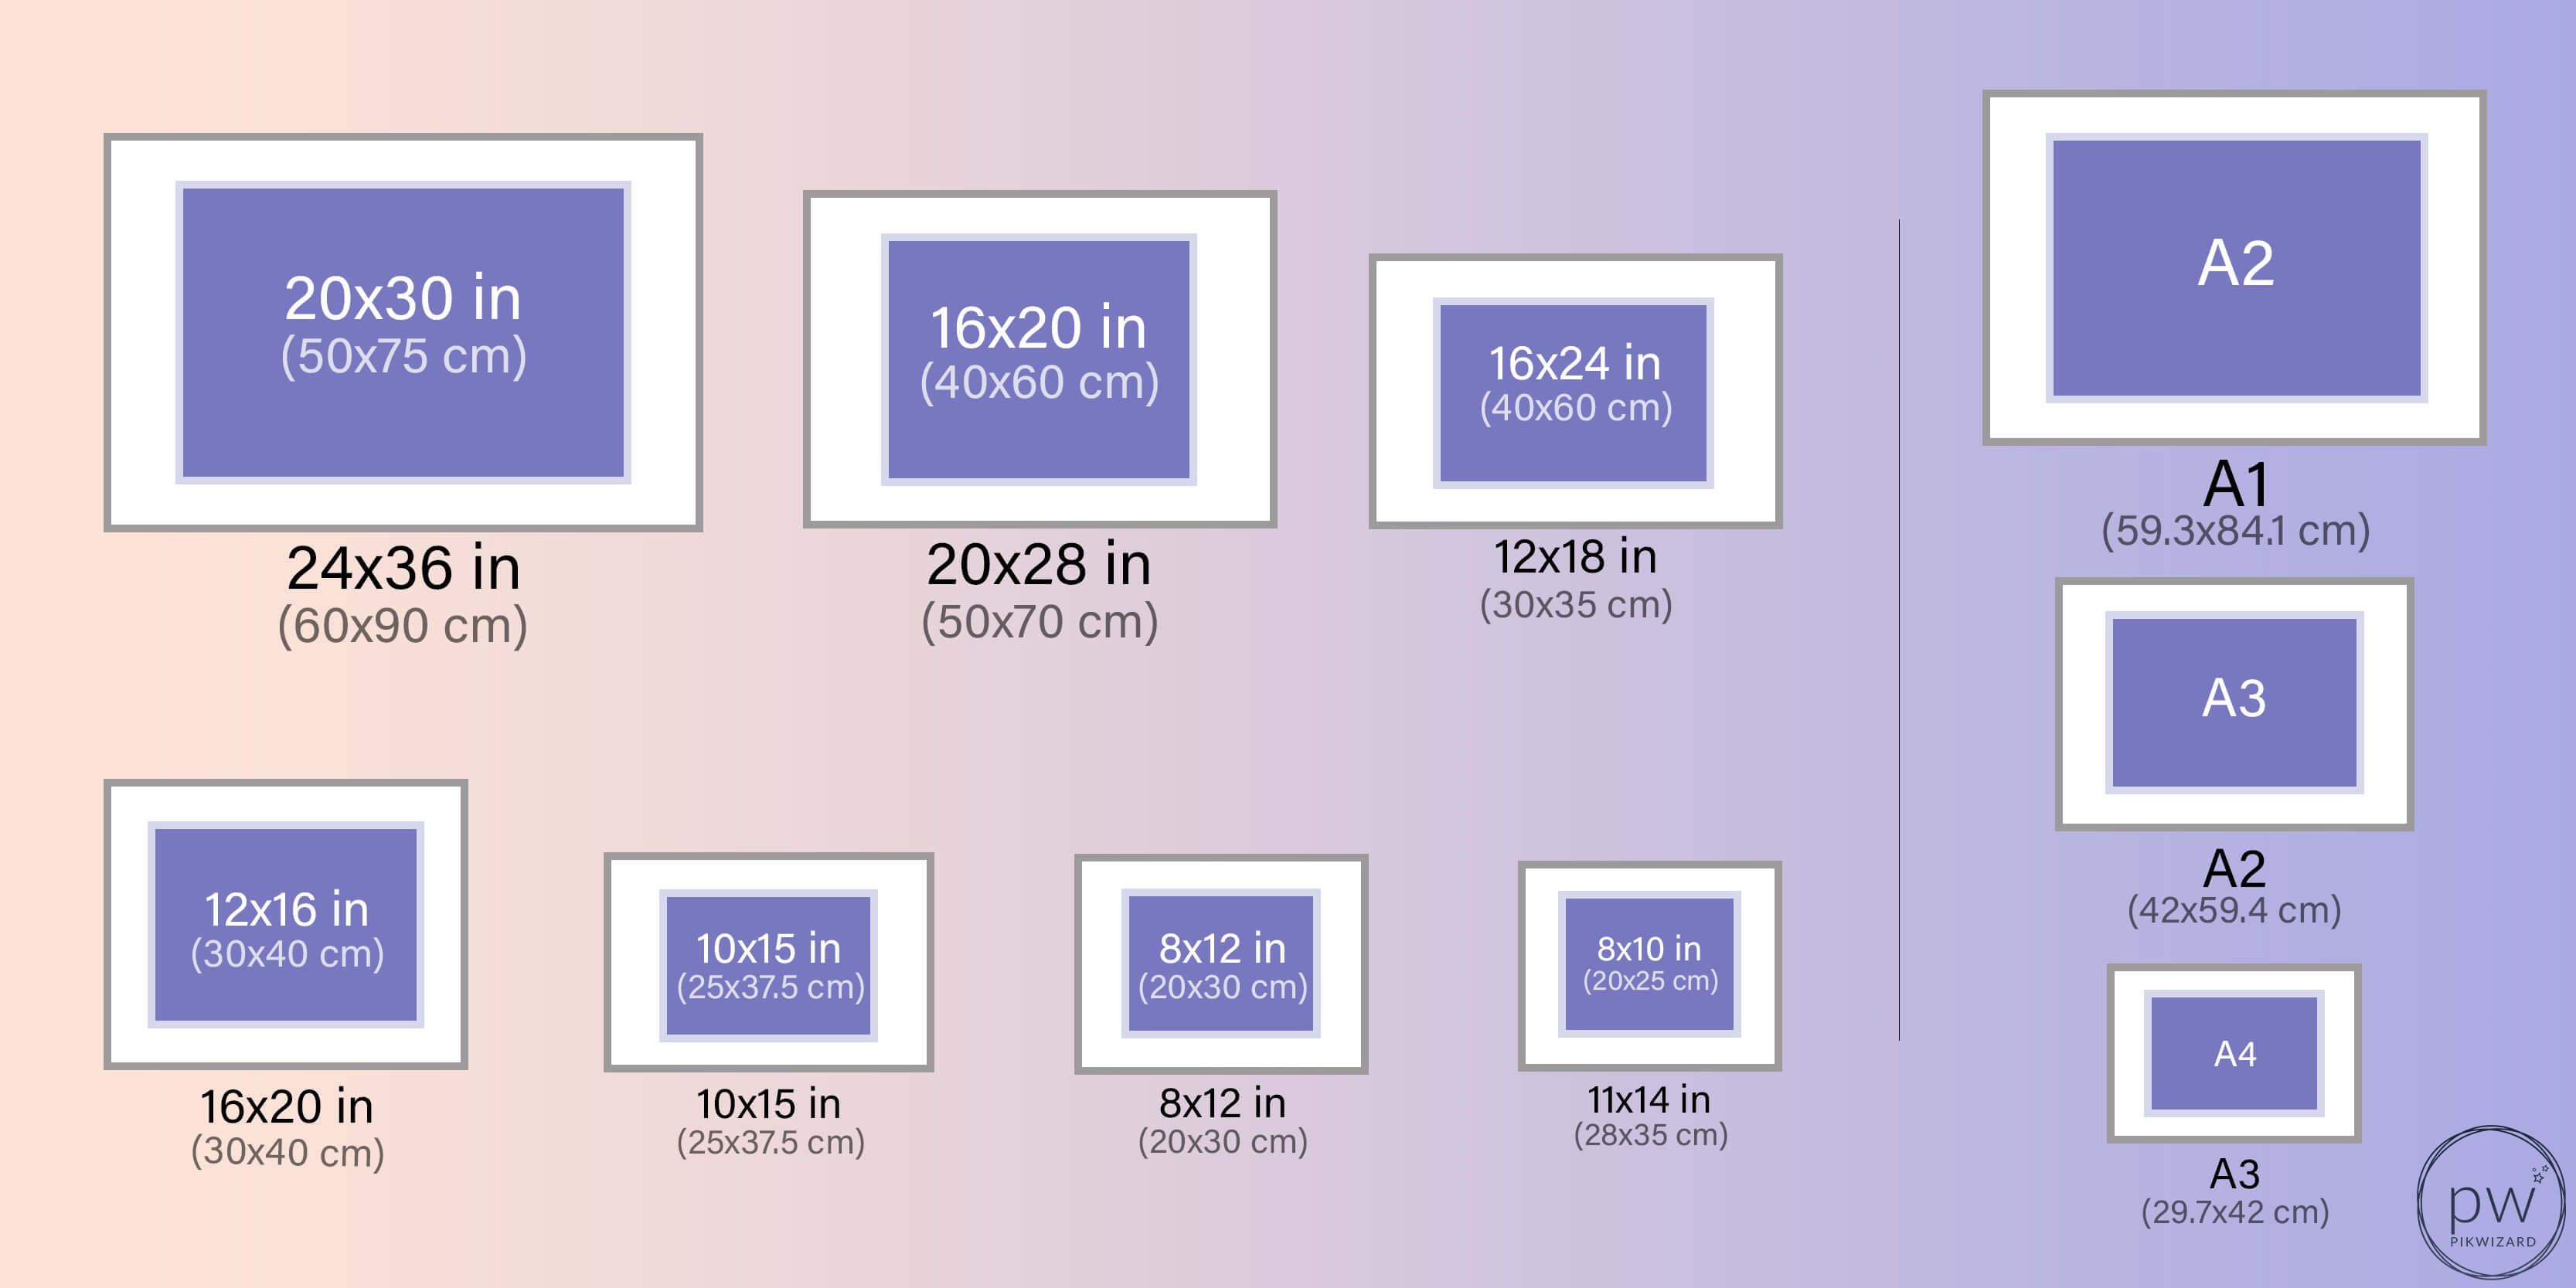
To get a good print of your photo, be aware of these standard sizes and choose the correct options for your purposes: 


To know all the things about photography, you have to take care about photography copyright. To know the maximum about this, you should read the guide for image copyright


Go on PikWizard, more than a million photos in the stock, on the website you will be able to have some background ideas and having some images for web designing


Standard photo sizes chart showing common sizes

What Resolution Do You Need for Standard Photo Print Sizes?

When professional photographers talk about resolution, they refer to how many pixels are displayed per inch of an image. It’s measured in pixels per inch or PPI. The unit of measurement for digital cameras is megapixels, which is the amount of detail a camera can capture with its image sensor. 


Photos with a higher resolution contain more pixels to form high-quality images while images with a low resolution have fewer pixels. For example, when you enlarge a low res photo, the pixels become visible and blur the image. 


When you use editing software to change the resolution, you’re telling the program how many pixels should go into each inch of your image. Make sure your photo has a high resolution when you open it for editing. It’s best to start with a good quality image and reduce the size or PPI from there.


If you want to know more about images, you can check our blog what's JPEG and PNG.

What is Aspect Ratio for Print Sizes?

Instead of using units of measurement like inches or centimeters, the aspect ratio is represented by the relationship of the width to the height in comparison to each other. It’s usually displayed in an x:y format, which determines the shape rather than the image’s actual size.


The aspect ratio changes depending on the medium your image shows on. This is important for web content where different ratios are needed for different uses like desktop, mobile, landing page, or social media. As long as you use the correct ratio for each of these, you get high-quality images for your web design.


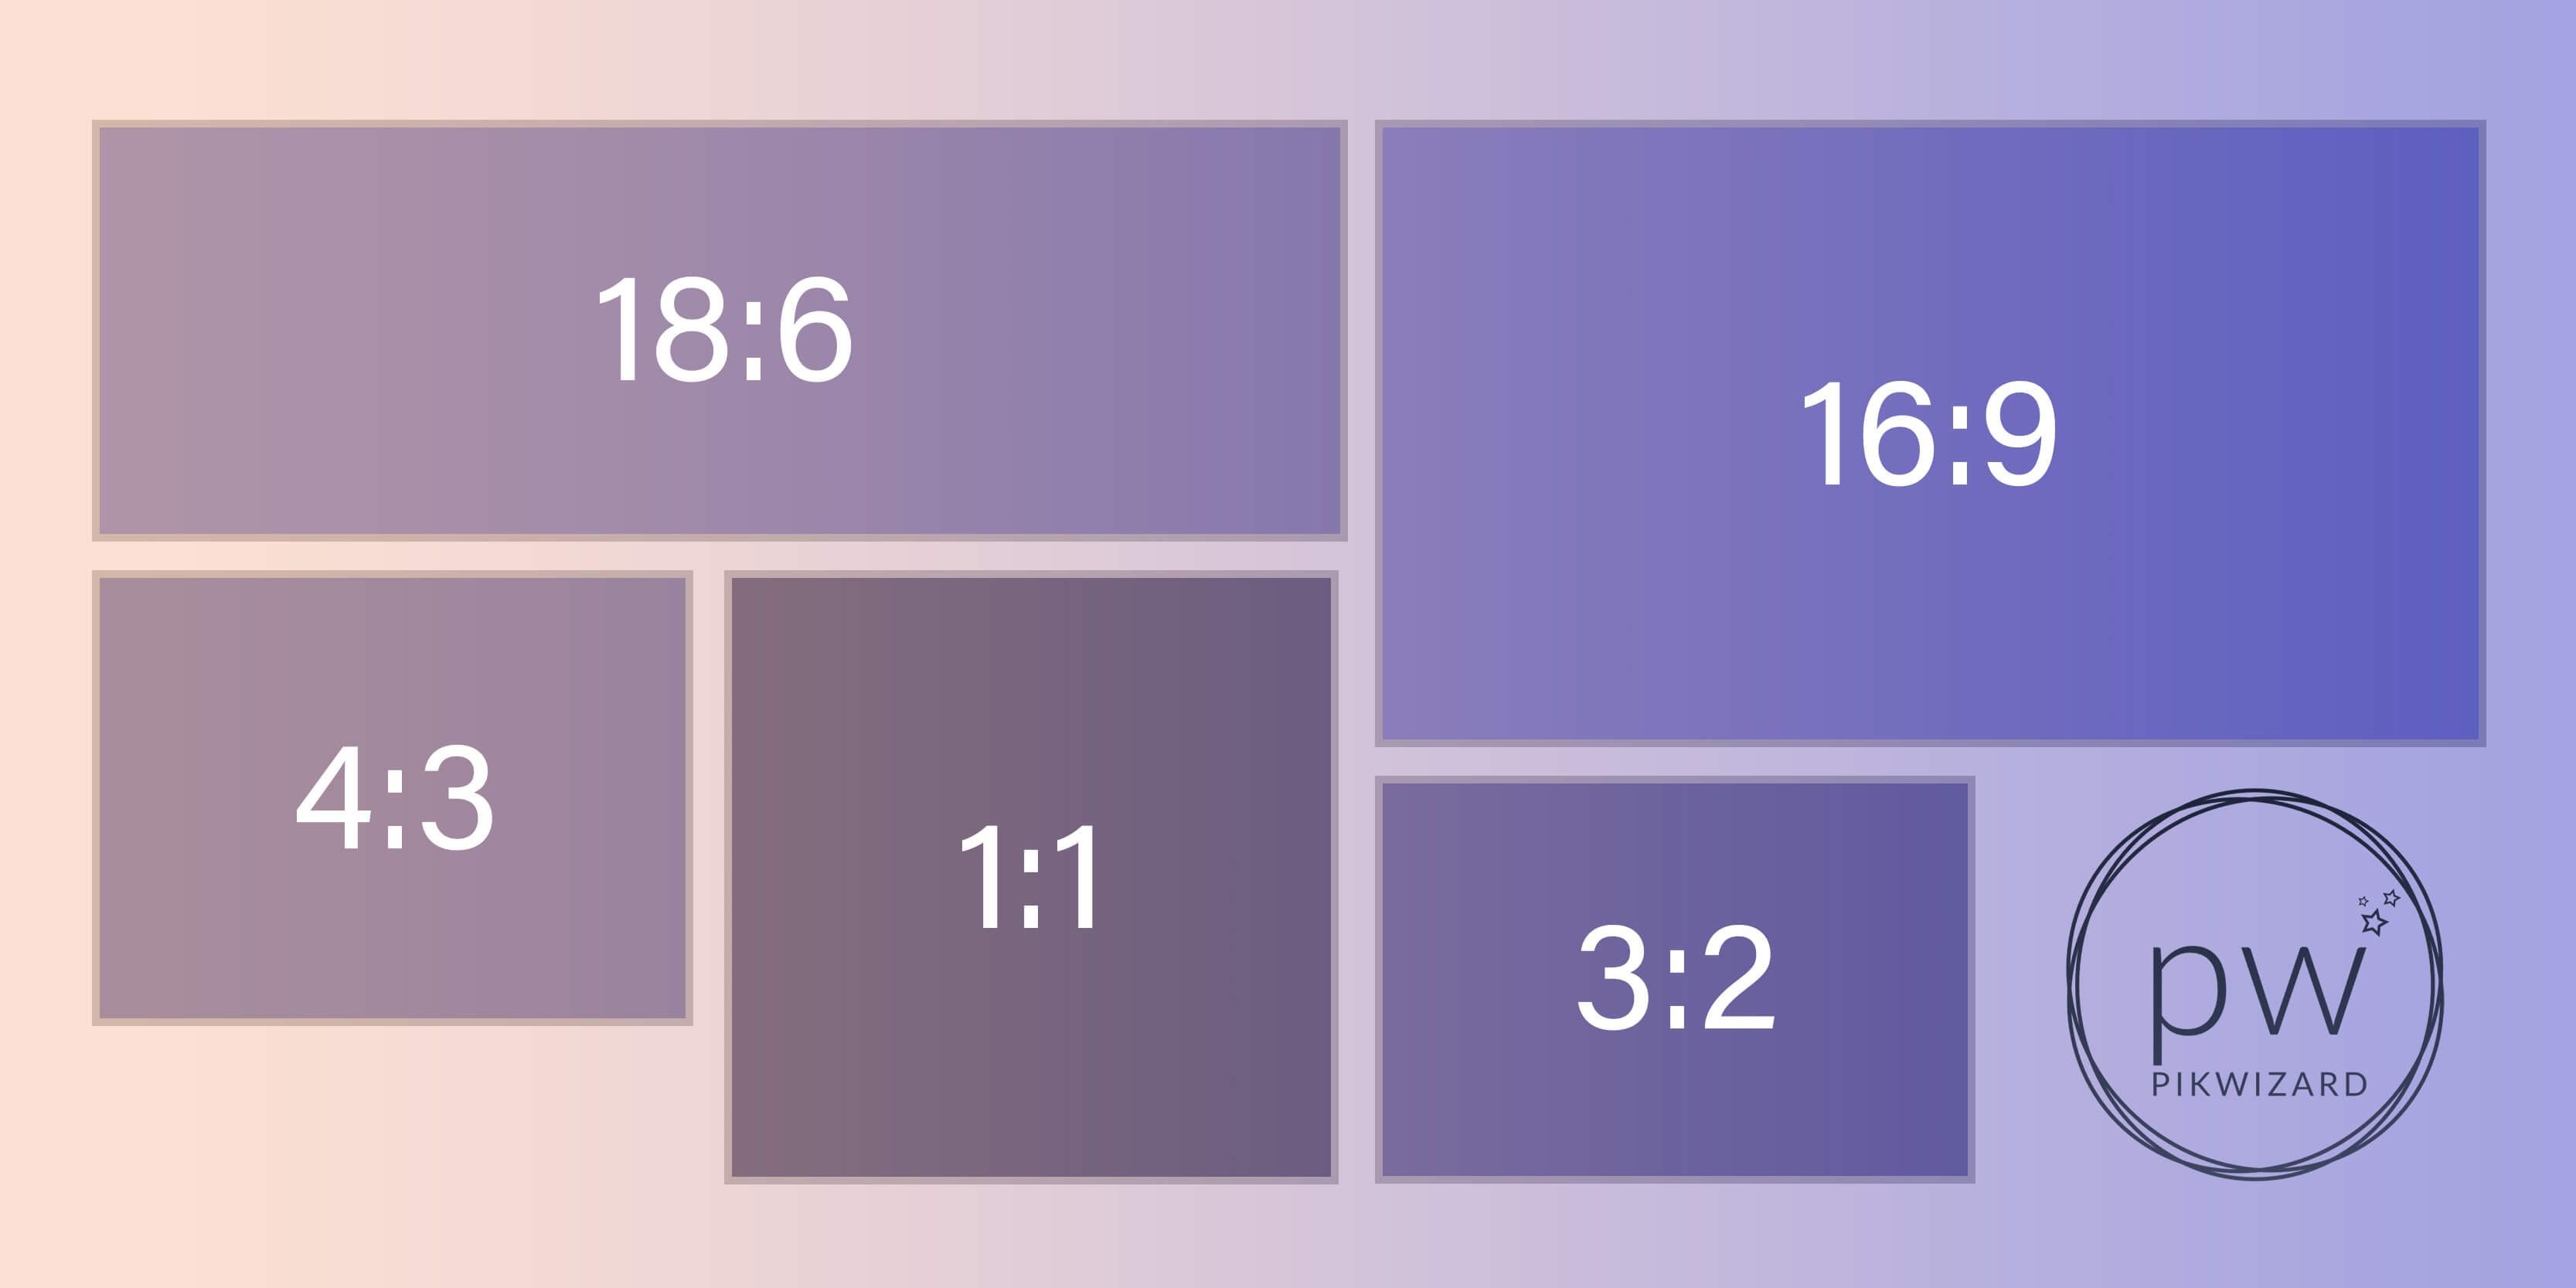
We’ve put together this list of the most common aspect ratios to help you choose the correct one for your purposes:


Graphic showing common aspect ratio of photos

1:1 Aspect Ratio

Both sides of your image are the same size, which makes this a nice square. Use this for social media profile photos.

3:2 Aspect Ratio

This is the aspect ratio of the original 35 mm film and is widely used in the digital photography and film businesses.

4:3 Aspect Ratio

Your computer monitor, TV, and digital camera use this aspect ratio. To fill those screens, make sure to take photos in 4:3.

16:9 Aspect Ratio

Most computer monitors and widescreen televisions use this ratio. It has a slightly longer width than 4:3.

18:6 Aspect Ratio

This is a popular ratio for long panoramic shots of landscapes that take the viewer’s breath away. Use this ratio to spruce up your interior design with your favorite holiday landscape photo.

How to Choose the Right Photo Sizes for Print

Before you think about printing your photos, consider where you’re going to display them. If your prints are gifts for your friends, take into consideration where they’re going to put your prints. Are they going to be large poster-like prints on the wall or framed for your mantelpiece or shelf? Should they be landscape or portrait layouts? 


If you’re planning on mixing different sizes, cut out templates from colored paper and stick them to the wall to get a picture of how you would arrange them. Consider the viewing distance to your printed image.


For example, a large poster on the wall can be slightly pixelated when you walk up close to it, but since everyone looks at posters at some distance, they won’t see the pixelation. On the other hand, you want to make sure your photo is resized correctly for a family portrait and has the right resolution to be viewed up close.


To get your photos printed, start by getting the resolution and format right. Too few pixels and your printer compensate for missing pixels by making part of them up to fill your photo page. If your PPI is too high, your printer shrinks the image and distorts it. 


Don’t enlarge your photo beyond its original size, as you’re going to lose out on resolution and quality. When resizing your image, make sure you’re saving your file as a png instead of a jpg to maintain pixel integrity. 


Graphic showing sizes needed to frame photos correctly

How to Choose the Right Frames for Your Images

If you want to avoid the struggle of finding a frame that fits your printed photo, consider choosing a frame that fits your interior design before you send your photos for print. This way you can make sure you get the size of your image right. 


Some frames have a two to three-inch border around the photo or matting that keeps your print off the glass, prevents strange surface effects and condensation damage, and makes your print look more professional. If you’re planning to go for a larger print, think about whether you want small or large matting around your photo.

How to Improve Your Photography Technique for Print

For a successful print of your favorite memories, use your digital camera instead of your smartphone. You can take good quality photos with your smartphone, but when you check which of your devices has a higher megapixel lens, your digital camera is highly likely to be the winner.


Taking great photos can be an art, but it doesn’t have to be hard. Here’s what to watch out for when using your digital camera to create your stunning new prints: 


  • Shooting in raw works well for getting high-quality prints, but if you’re taking photos in JPEG format, make sure your camera is set to the highest possible quality setting.
  • Use manual mode and focus manually instead of selecting auto exposure on your camera.
  • Use a lower ISO setting to prevent grainy photos. If you want to get a bright image at a low ISO, decrease shutter speed for longer exposure.
  • Aim to capture most of the scene you’d like to have on your final print to allow for any cropping. If there’s a person or an object at the center of your image, make sure you don’t zoom out too far and risk pixelation. 
  • Follow the best practices of good composition by applying the rule of thirds, which helps your photos be more aesthetically pleasing.


While this remains to be standard guidelines for capturing great photos worthy of printing and uploading on social media platforms but sometimes it's hard to pull out a great shot especially due to climatic conditions in such cases one can make use of online image enhancement tools

How to Choose the Right Size for Your Screen and the Web

When you need to resize your image for use on screens you need fewer pixels than required for printing. Think about what size your photo will be on your screen and what you’re going to use it for to choose the aspect ratio you’re aiming for. 


For your website, edit your photos to the right size to avoid large file sizes causing slow site speeds. Don’t avoid this process by relying on a responsive design that shrinks your images to fit. A browser still has to load the larger image in the background slowing down your web pages. For example, if you visit our Feet Pics page you will find high resolution images which can be used on your website, but you will have to squeeze the images size not to slow down your web page. 

Standard Photo Sizes on Social Media

Image sizes change frequently on all social media channels as interfaces are redesigned or the official dimensions are updated at seemingly random intervals. Keeping up to date with the right size for your images is as essential as following the latest trends to create successful social media campaigns. 


Here’s why resizing your images correctly for social media should be a priority:


  • It can come across as unprofessional if your images are pixelated or stretched on your feed.
  • Your audience gets to see the full image. If resized incorrectly, your photo might display cut off.
  • Each social media feed is different, so make sure you’re using the right size for the account you’re posting to or risk your posts looking great on one channel and pixelated on another.


If you’re looking for a quick and easy solution to create beautiful social media posts, consider using high-quality stock photos. On PikWizard, you can get creative and add text to your image to have an eye-catching image ready for social in minutes.


To prevent your visual content from looking off, follow our guide with the most recent image sizes:


Instagram Image Size Tips

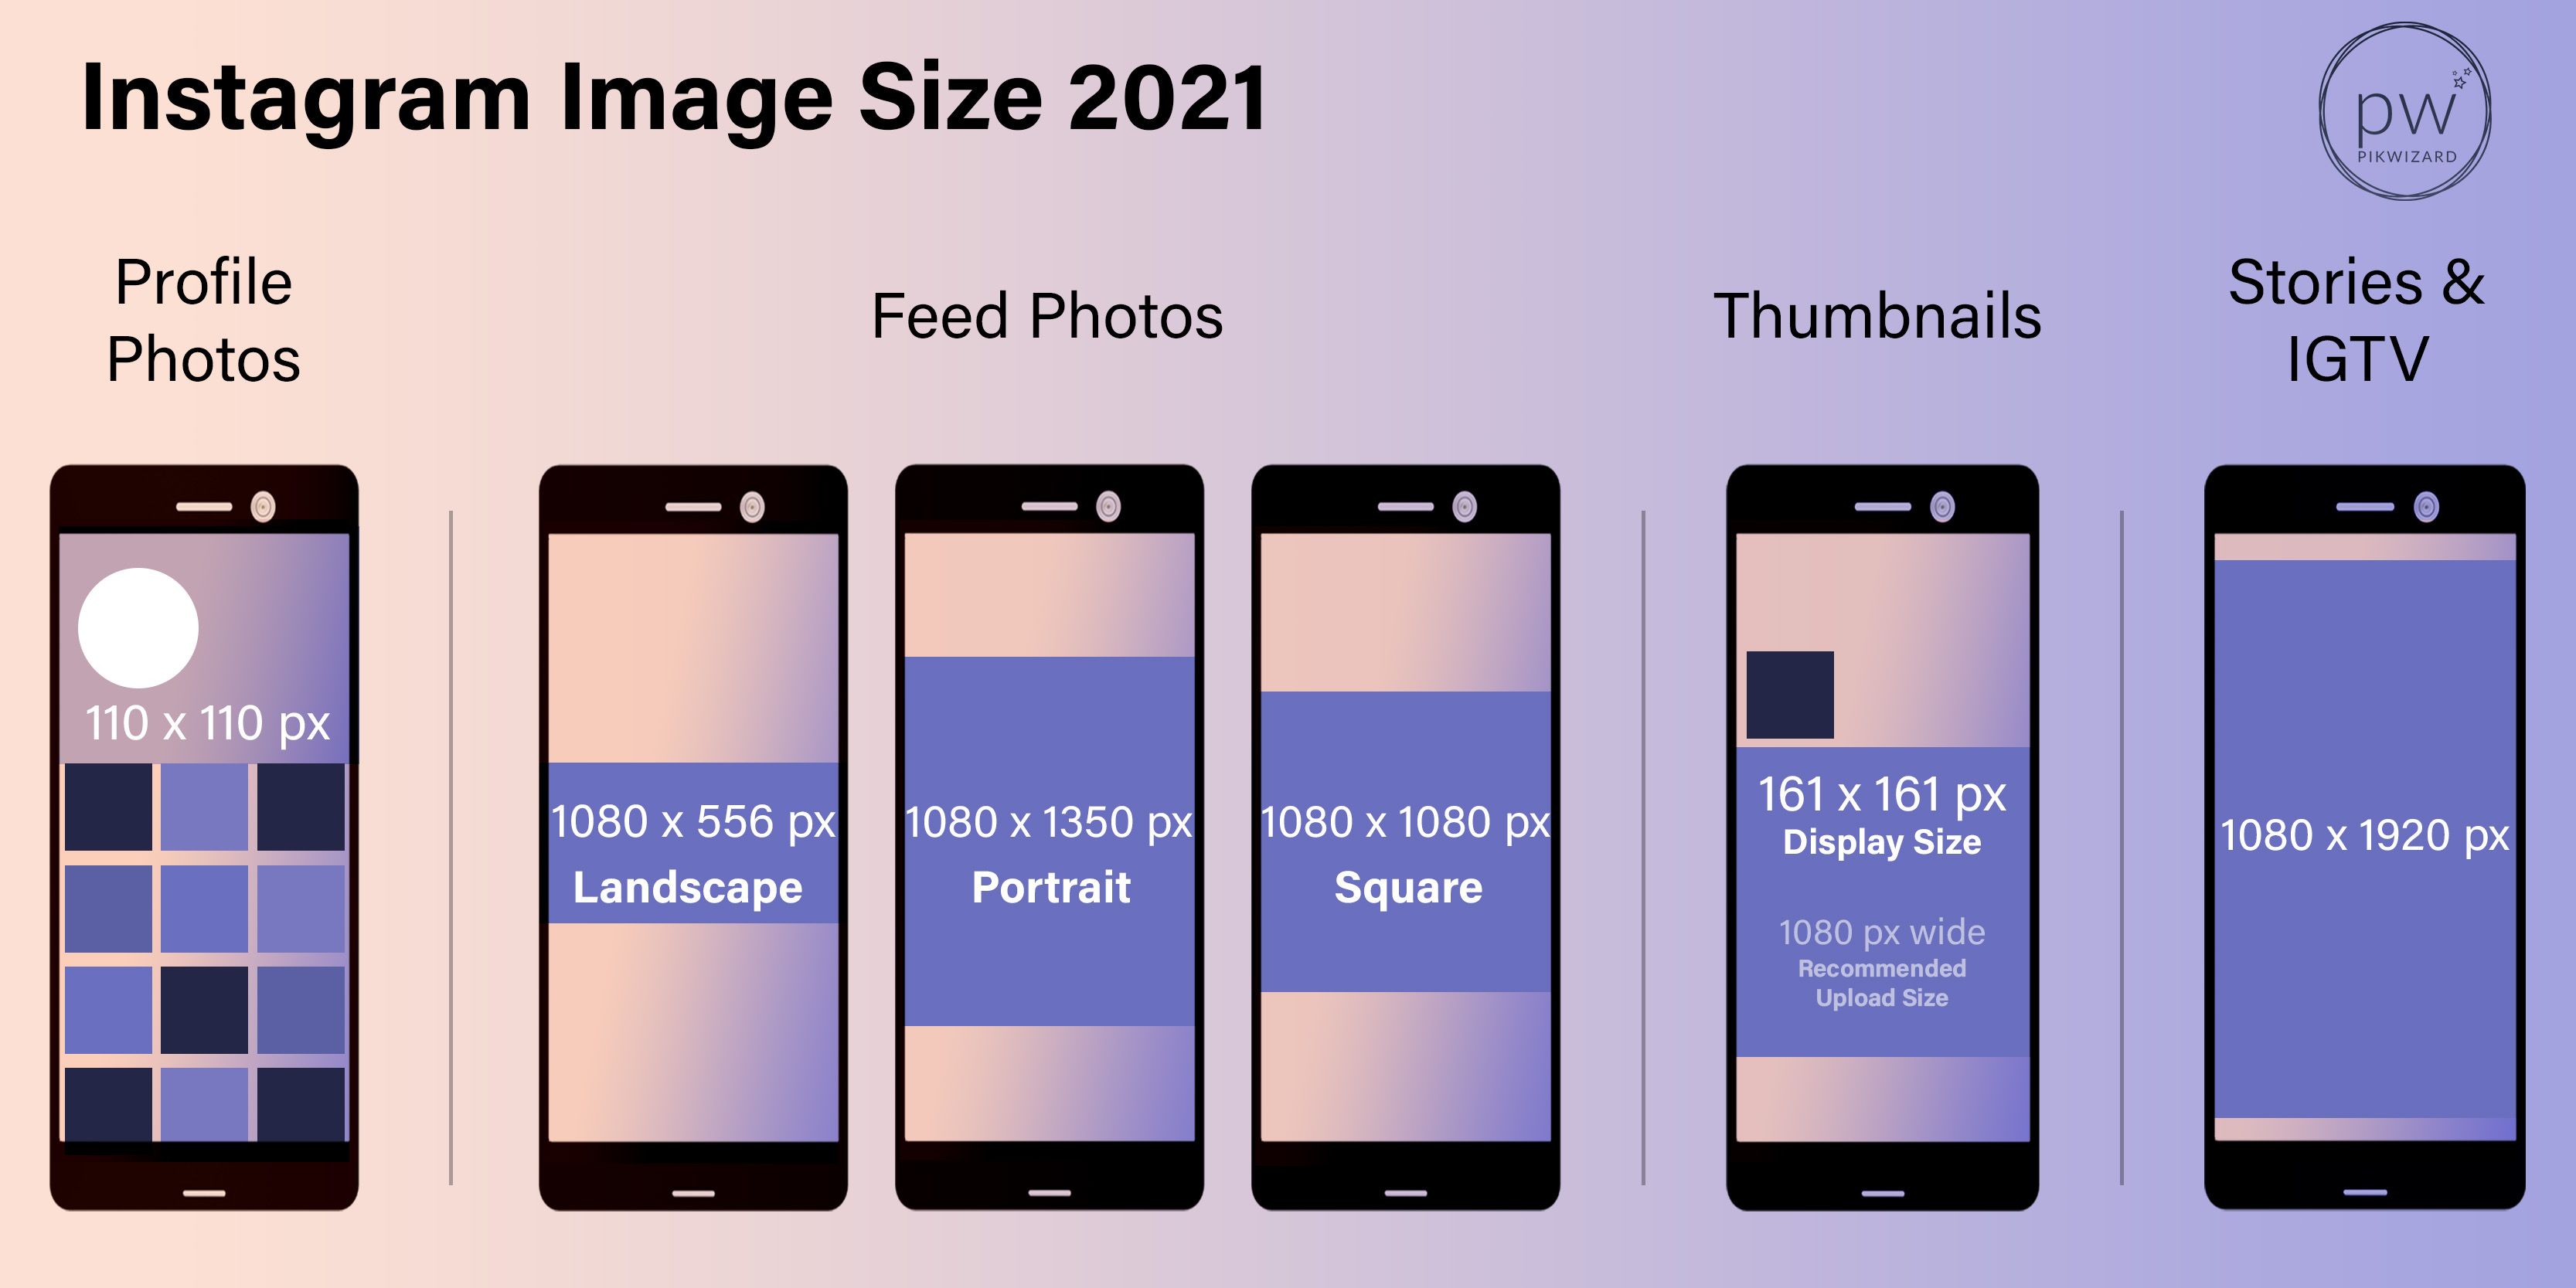
Instagram Image Sizes Chart

  • Remember that even though you can upload your profile photo in square format, it’s going to be displayed in a circle. Make sure all the important elements are centered.


  • Aim for an image that is 1080 pixels wide. Images with a width between 320 and 1080 pixels. Use an aspect ratio between 1:1 or 1.91:1 for square or rectangle photos and 4:5 for portraits to keep their original resolution. Everything else will be resized automatically. 


Facebook Image Size Tips

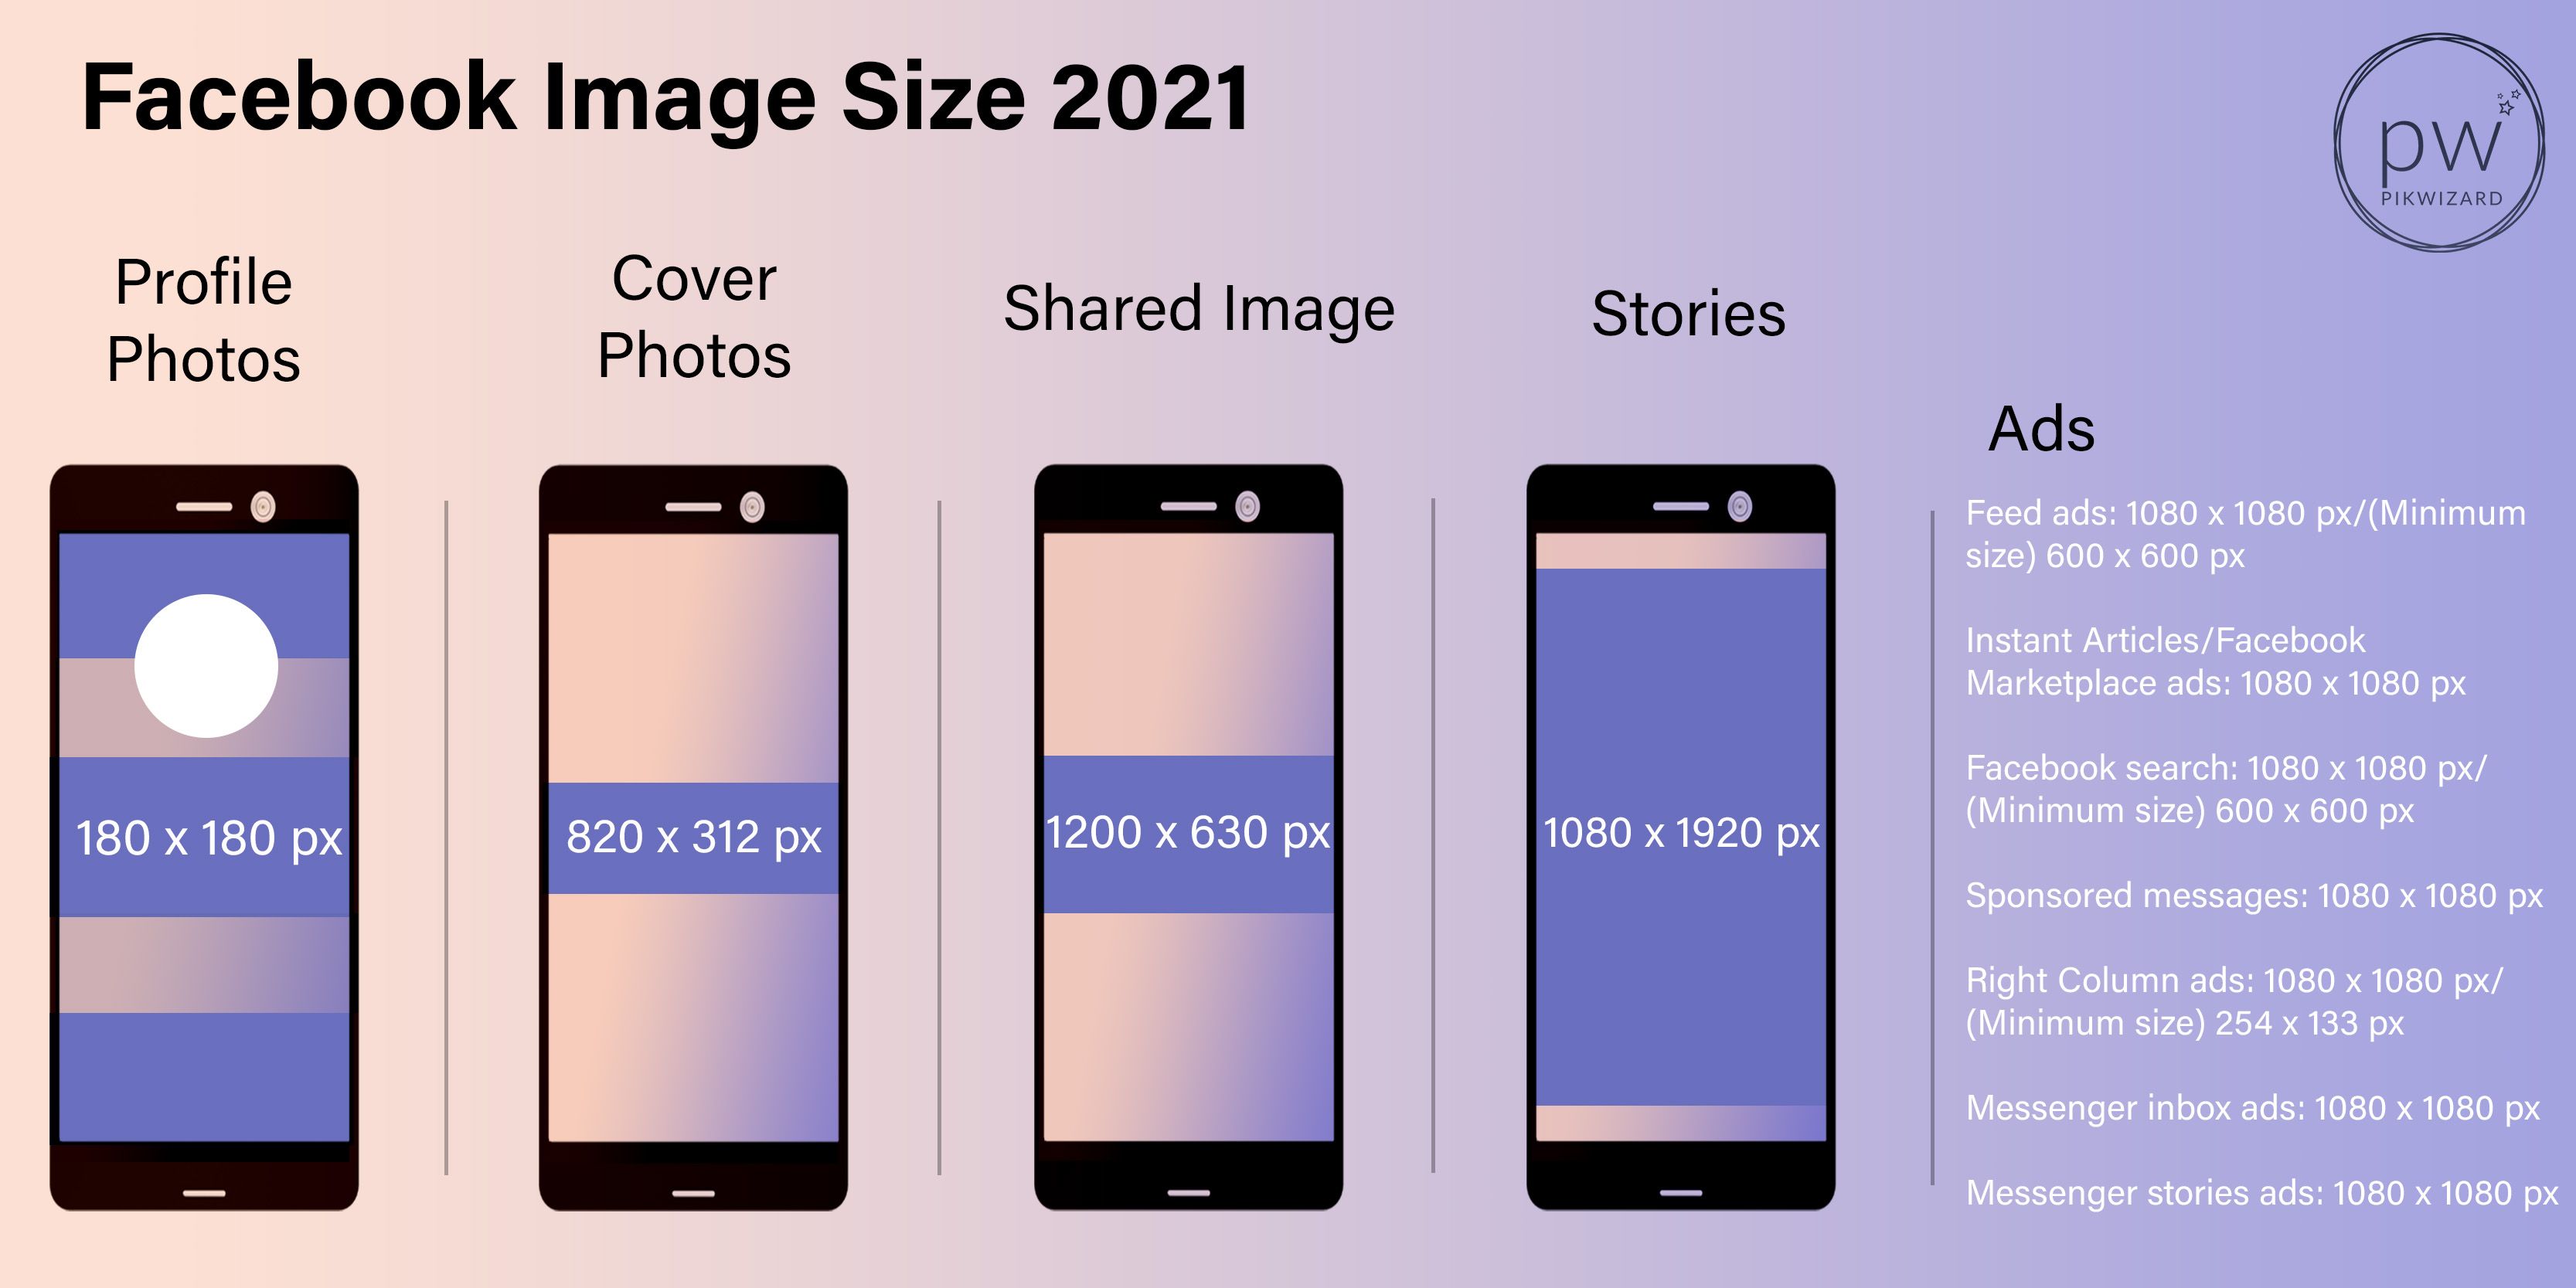
Facebook Image Sizes - A complete guide to standard photo sizes to find the perfect resolution & aspect ratio for your design - Image

  • Upload your images in JPG or PNG format to avoid any compression. PNG works best for profile and cover photos.


  • For a carousel post with two to ten images the best size to go for the recommended image size of at least 1080 x 1080 pixels.


  • For 360 photos, use the JPG format and make sure your image isn’t bigger than 30 MB.


  • Facebook Stories have an aspect ratio of 9:16. Make sure your image isn’t smaller than 500 pixels. Ensure you leave 250 pixels of the top and bottom of your story. This is where your profile photo or any buttons display.

Twitter Image Size Tips

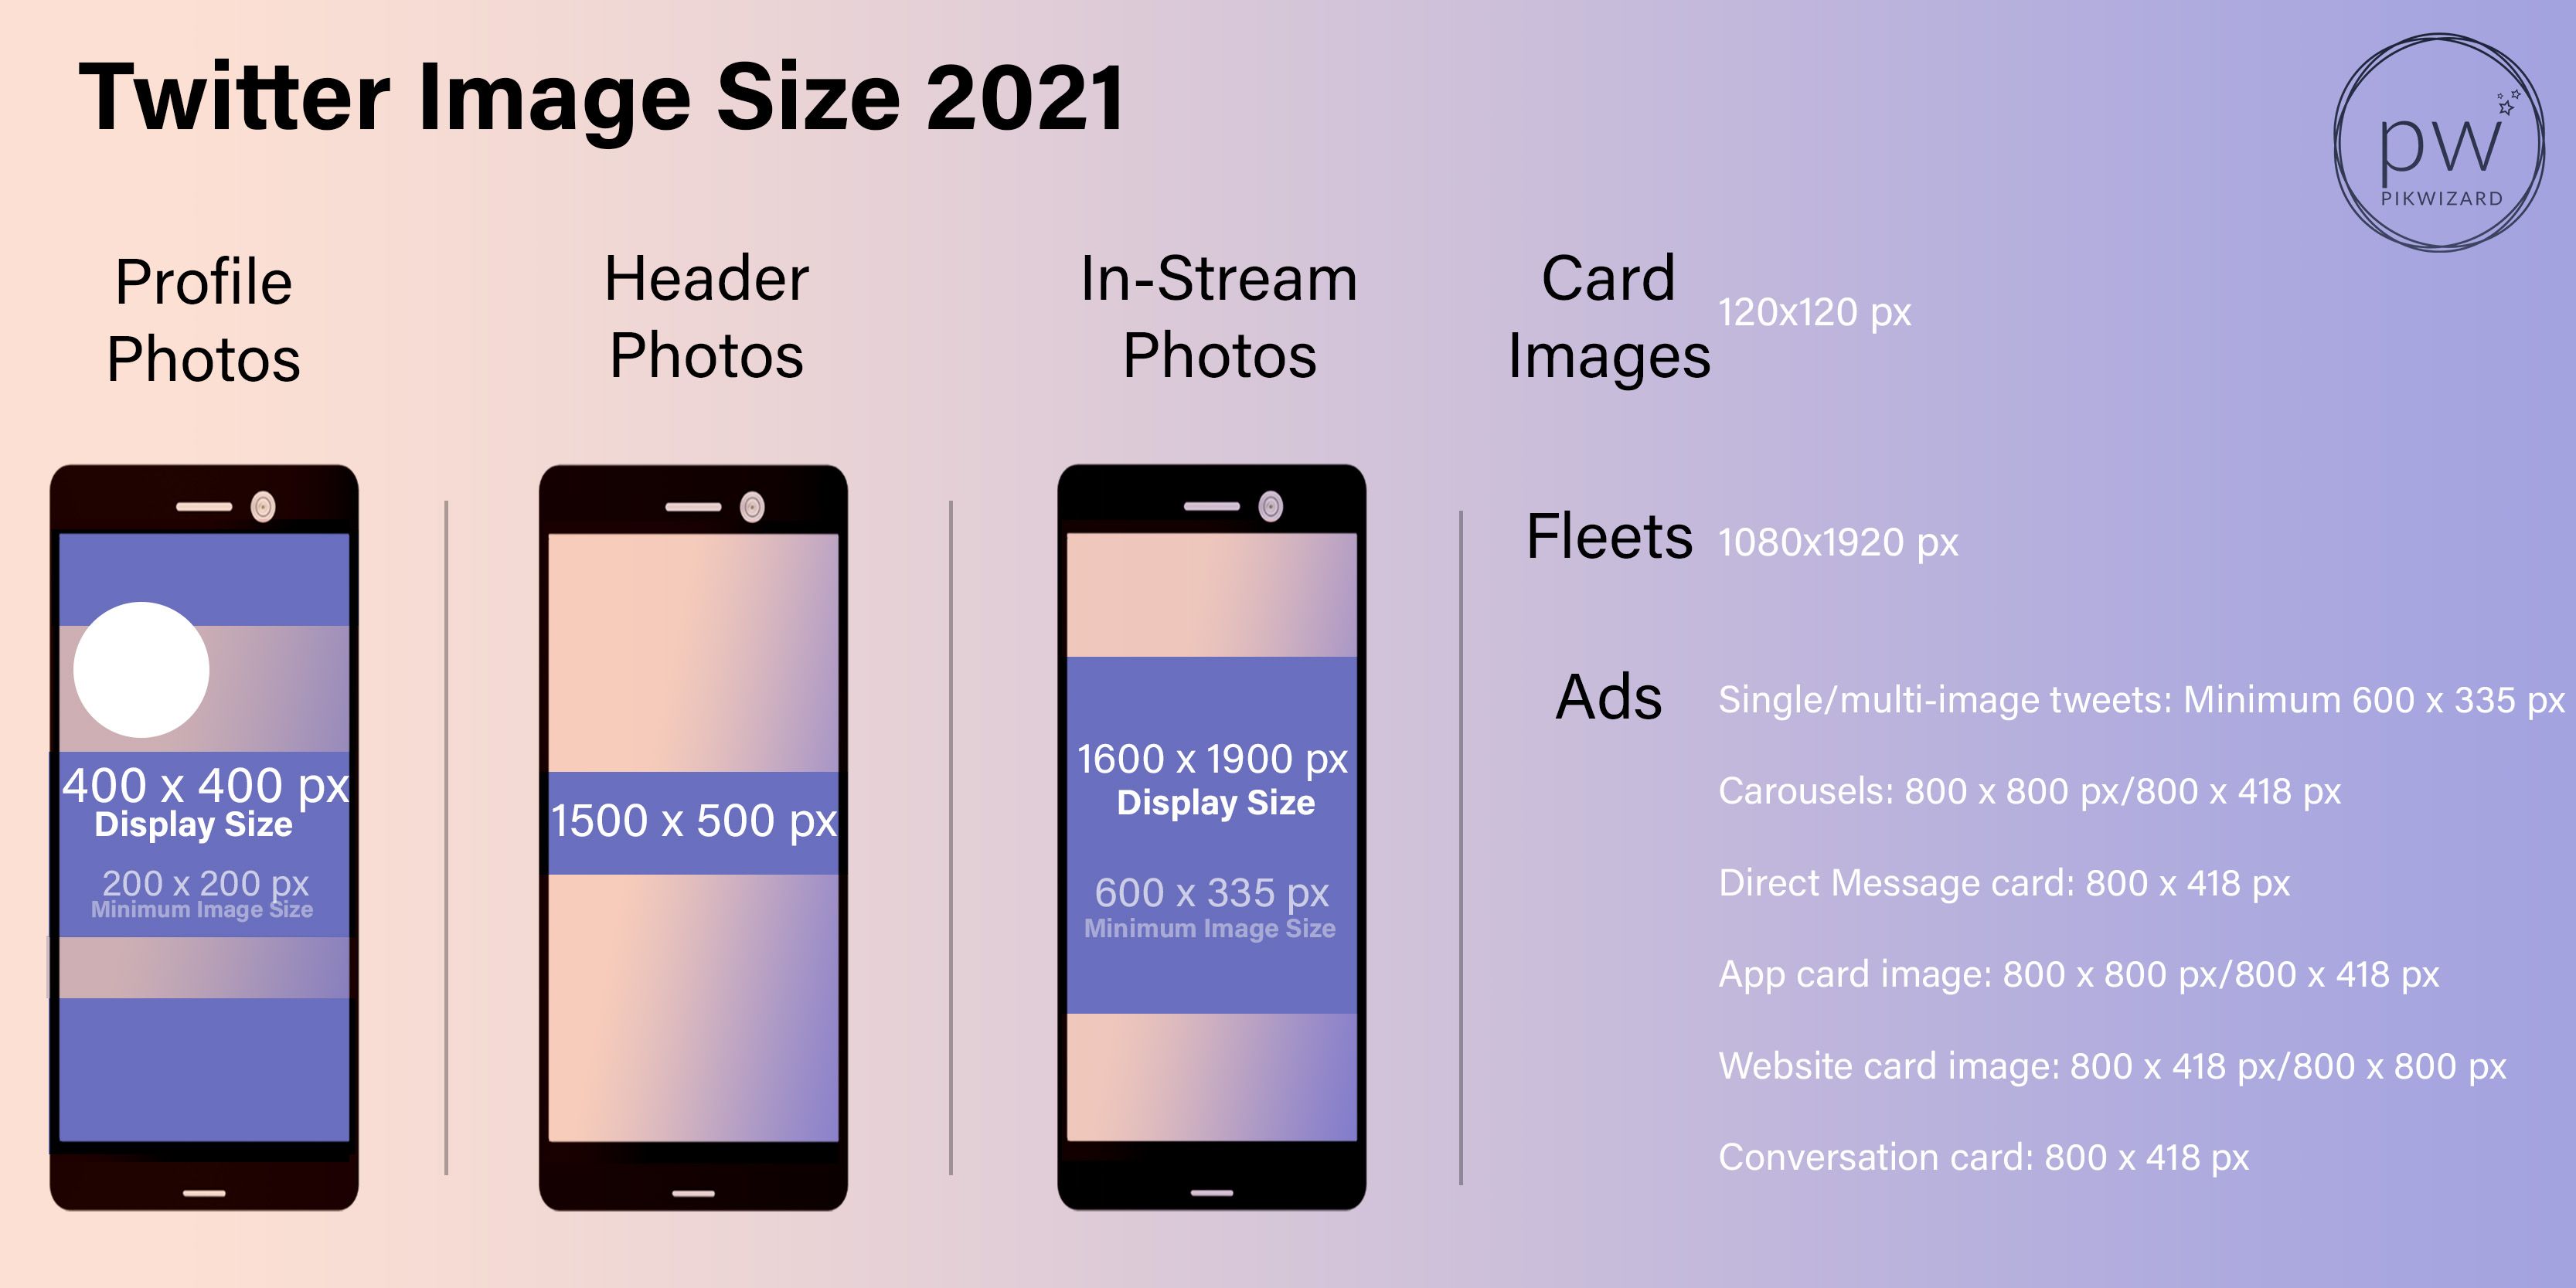
Twitter Image Sizes Manual

  • Use the maximum size to ensure your image displays well when dimensions change in the future.


  • Header images on Twitter are responsive and change according to the screen or browser they display in. They are cropped to an aspect ratio of 3:1.


  • If you’re using a link in your tweet but no image, Twitter automatically pulls an image from the website to create a preview. Use the card validator to see what it looks like before you post.

LinkedIn Image Size Tips

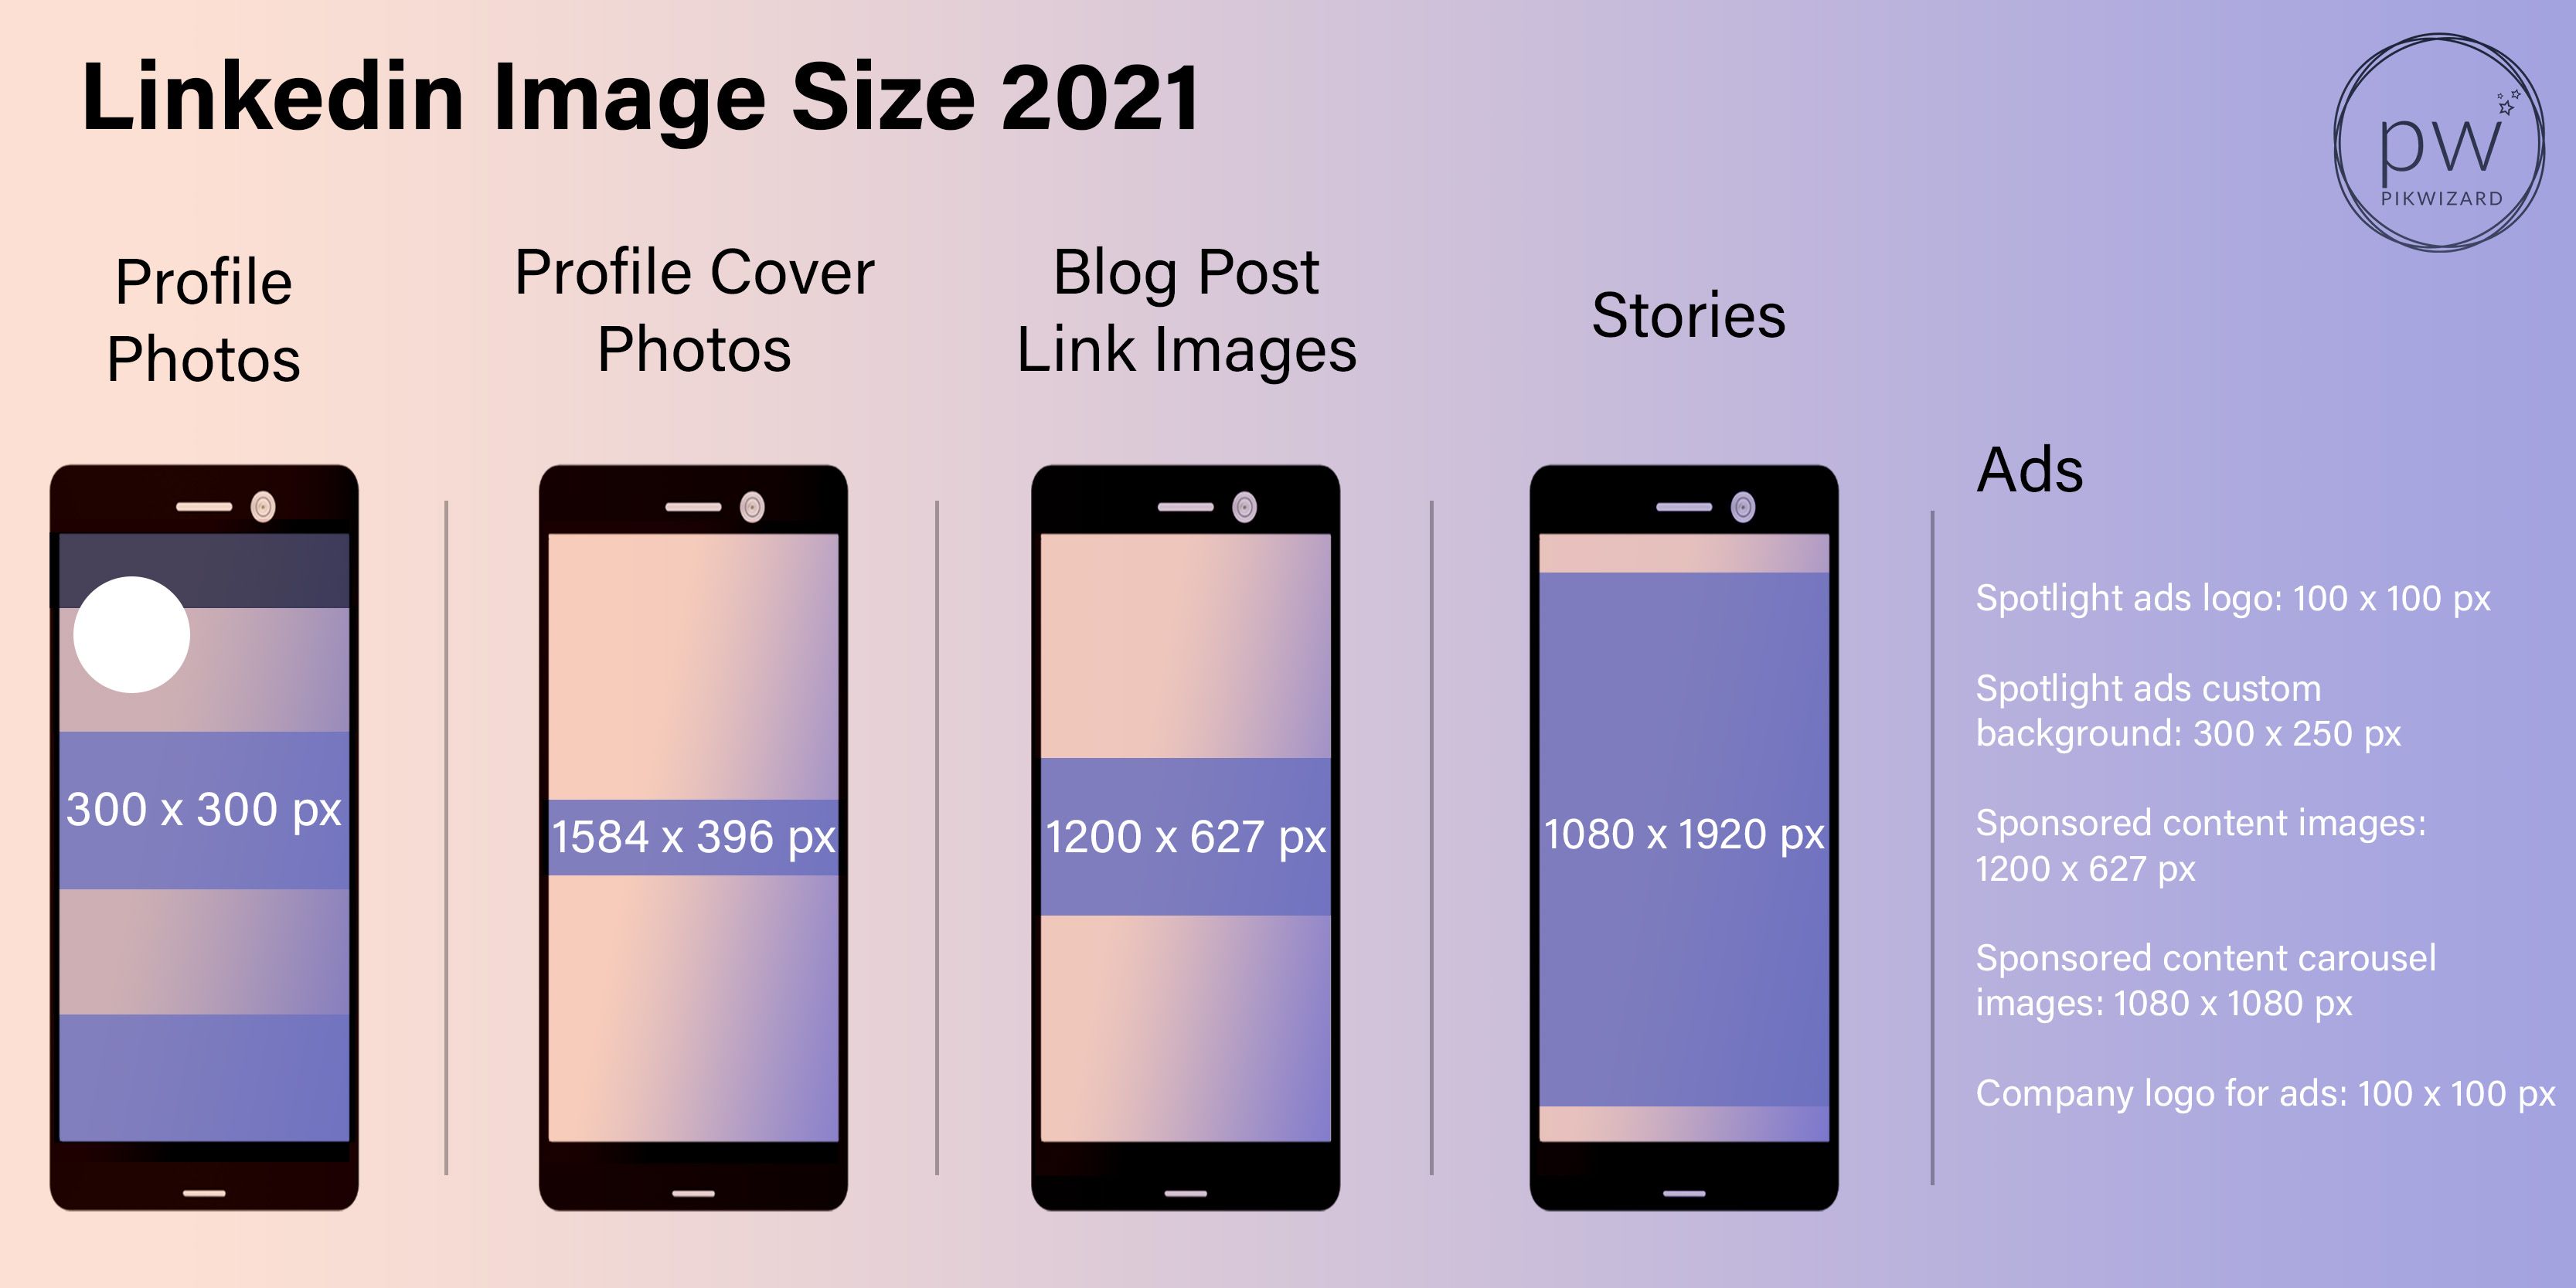
LinkedIn Image Sizes Guide

  • LinkedIn lets you upload photos with dimensions of up to 7680 x 4320 pixels with a file size of up to 8 MB.


  • Your cover photo is cropped differently according to the device you view it on. Check your cover photo on both mobile and desktop to see if it looks good to you.


  • Ensure the images you get ready for your posts are in JPG or PNG format with an aspect ratio between 3:1 and 2:3. 


  • If your image is less than 200 pixels wide, it displays as a thumbnail on the left side of your post.

YouTube Image Size Tips

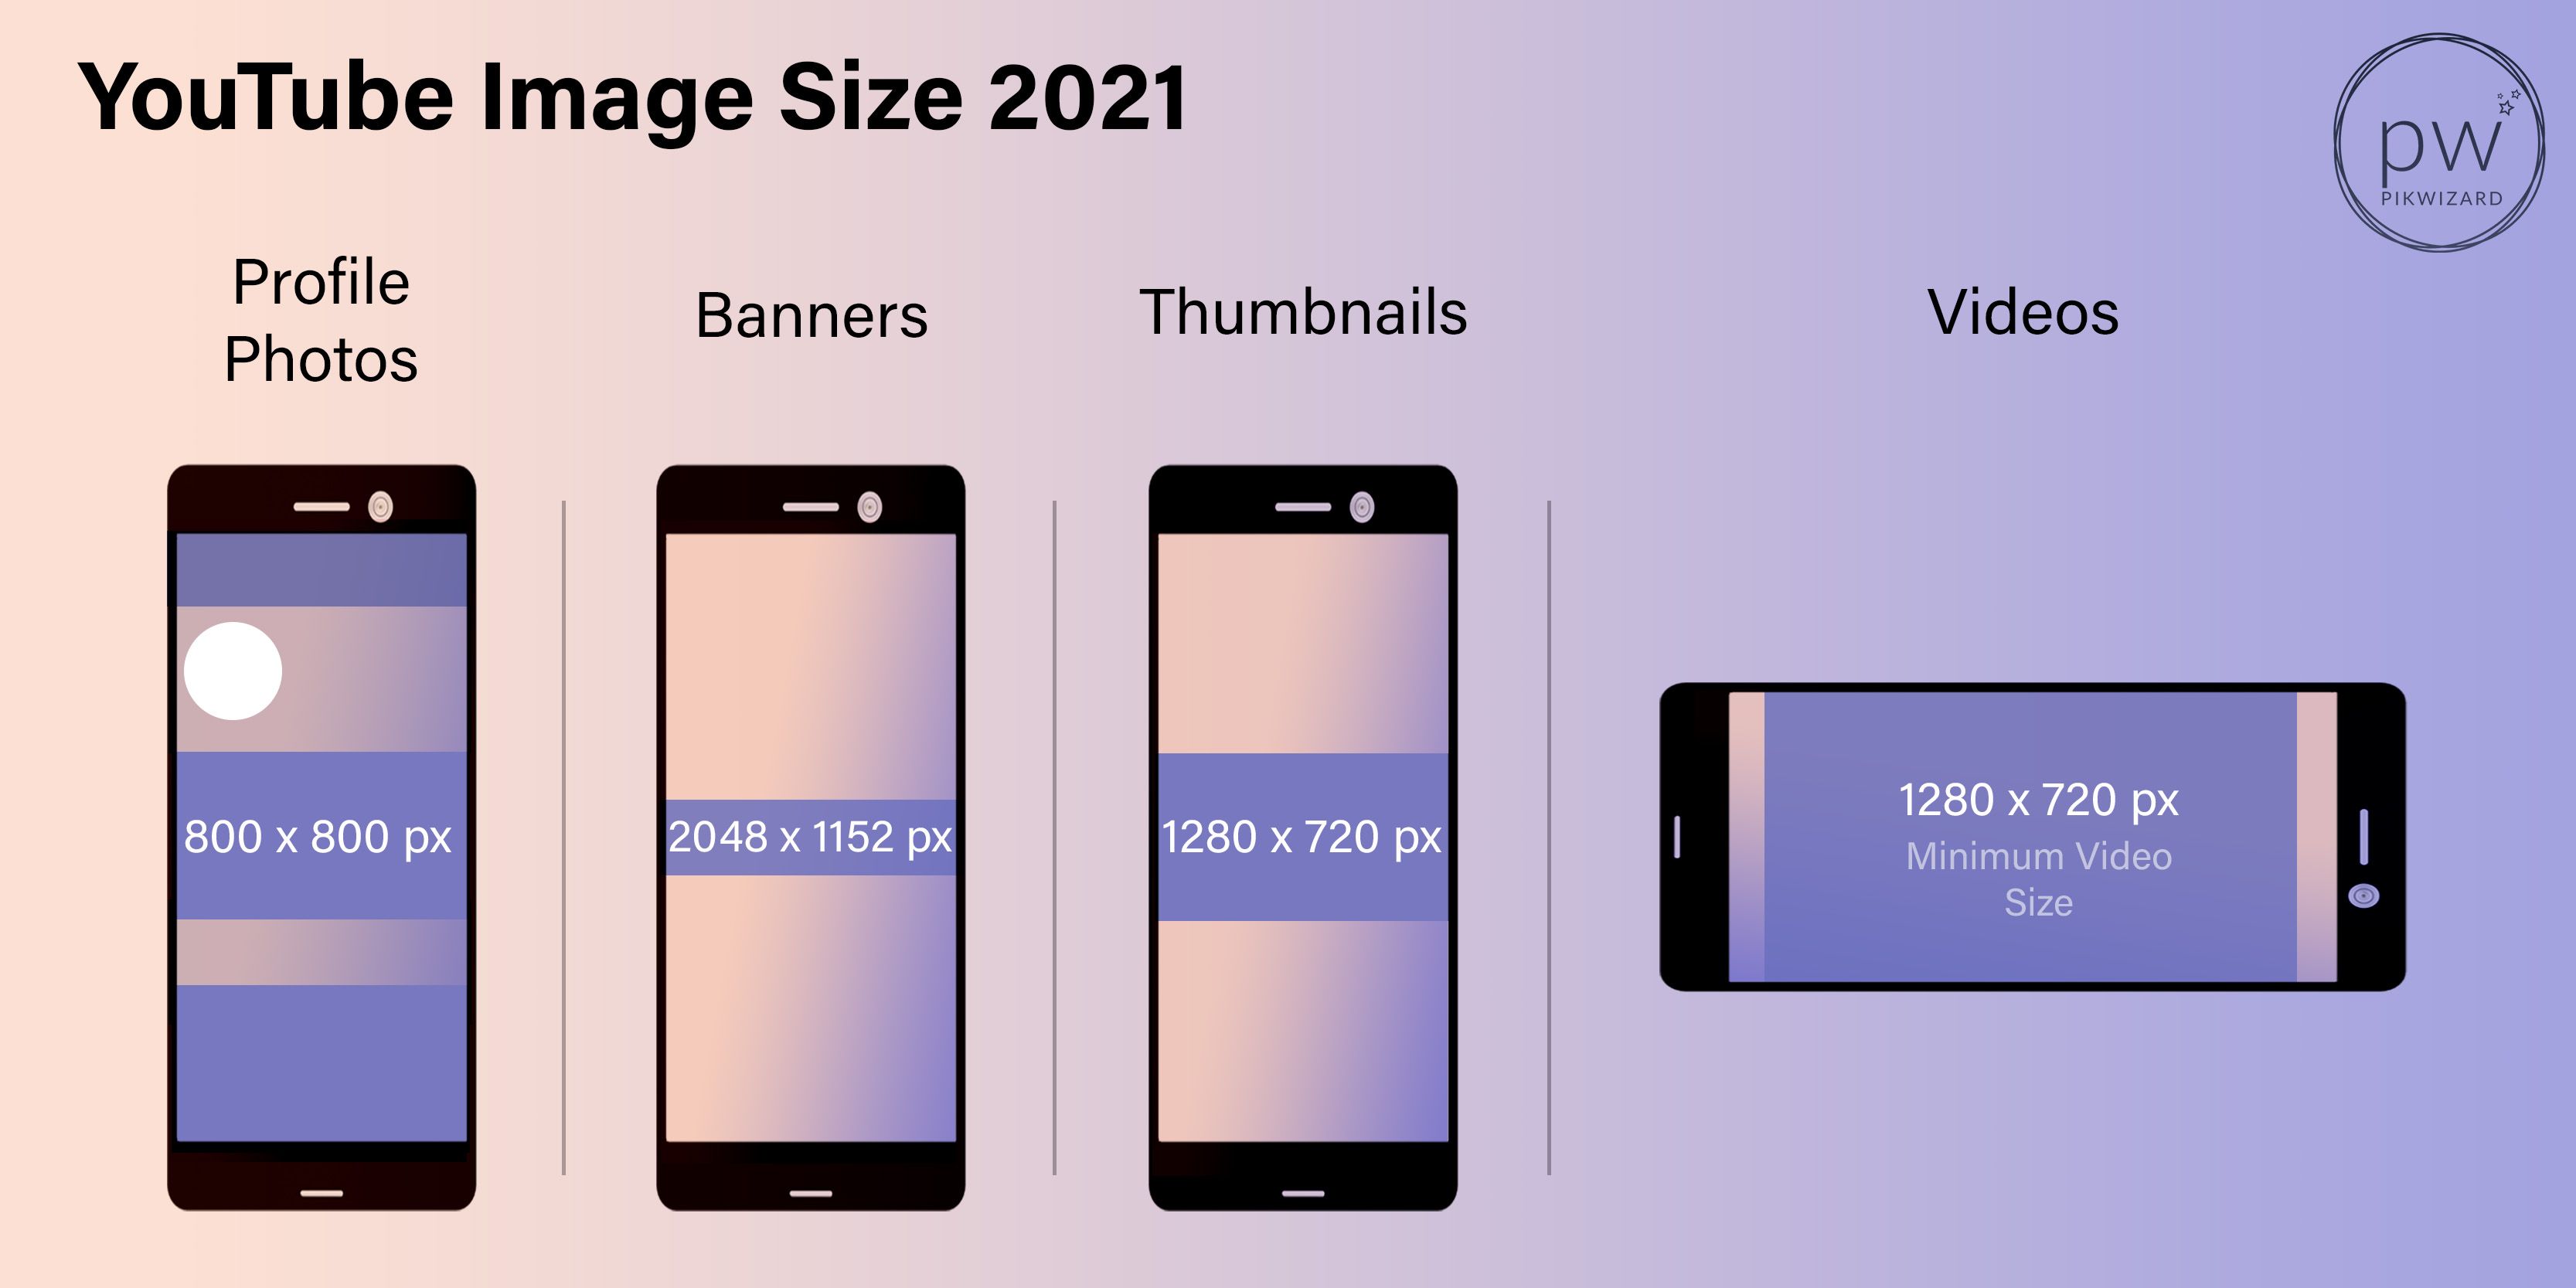
YouTube Image Sizes

As your profile photo displays in a circle on YouTube, ensure that the person or object you want to show is right in the center of your image.


You can upload JPEG, BMP, PNG, or GIF files, but GIFs won’t display with animation on your profile.


The recommended video size for HD quality is 1280 x 720 pixels with an aspect ratio of 16:9.